

Google allows you to choose a person who can have access to your data if your account is deemed inactive. The feature is available through the Inactive Account Manager and can be useful in cases of death, for example, to leave a “will” with access to account information. The company allows you to determine in advance how long the account will be considered inactive and what information that person will be allowed to see. Below, understand how Google classifies an account as inactive and see the step-by-step to leave a “will” of your data, as well as tips for choosing the “heir” of the information.
What makes a Google Account inactive?
Google uses different signals to classify an account as inactive, such as last login records, actions on the “My Activity” page, Gmail usage, and check-ins on Android phones, for example. When a Google account is considered inactive, all tools are disabled, including Google Drive, Chrome, and other Google services. The Gmail address, for example, cannot be reactivated.
You can choose up to 10 contacts as heirs. The chosen people will be notified about the “inheritance” by e-mail, and have up to three months to access the contents and download what they deem necessary. The account owner can also order the deletion of all content after the inactivation of his profile.
How do I choose who manages my Google Account?
Before you choose a person to leave your Google Inheritance to, remember that they will have access to all the content you grant them access to, and can download and share the materials later on their own. This includes Google Chrome stories, Google Drive files, Gmail messages, contact books, purchases, Google Fit information, and more. So be cautious and choose someone you trust.
How to use the Google Inactive Accounts Manager
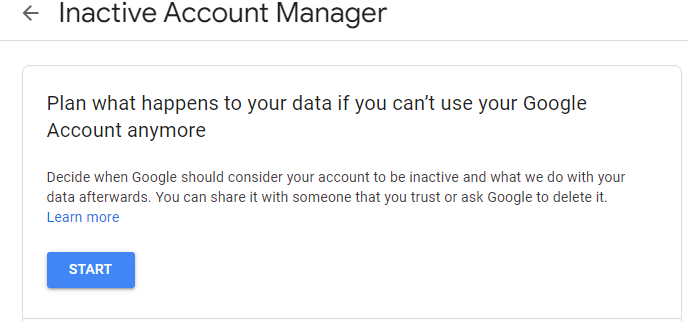
Step 1: Go to the Google Inactive Account Manager page (myaccount.google.com/inactive) and click the “Start” button;
Step 2: Tap the pencil icon to determine how long it will take Google to identify that your account is inactive;
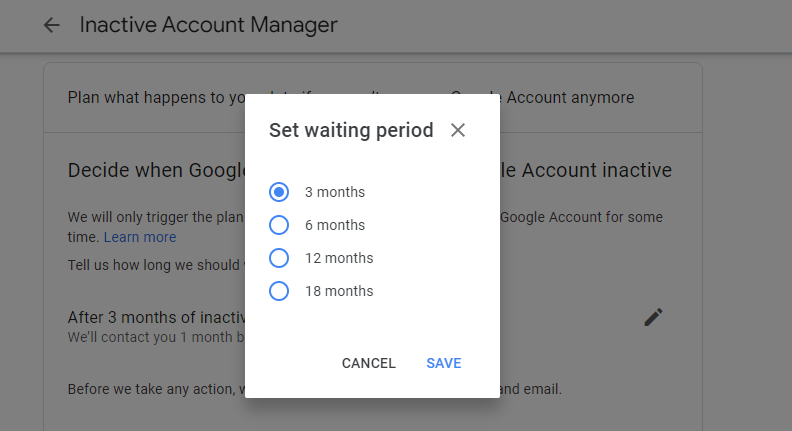
Step 3: Select the desired number of months and finish with “Save”;
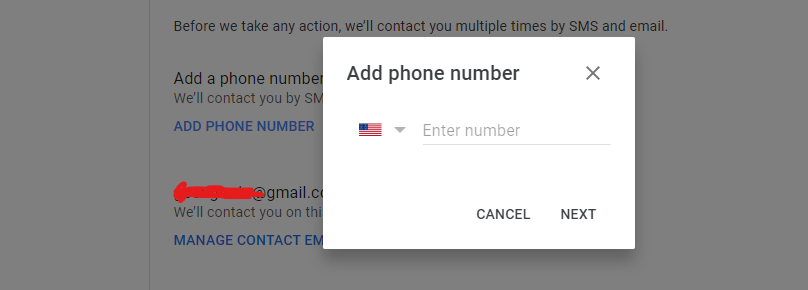
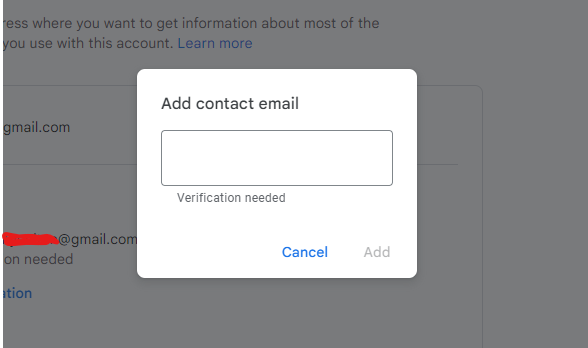
Step 4: Add a recovery phone number and email address and click “Next”;
Step 5: Click “Add person” to choose the contact who will be responsible for your account after the inactivity period;
Step 6: Enter the contact’s e-mail address and click “Next”. The e-mail does not necessarily have to be from Gmail;
Step 7: Check the services the contact will be able to access and click “Next”;
Step 8: Enter the person’s phone number and click “Save”. When your account becomes inactive Google will send a message to confirm the contact’s identity;
Step 9: Once the contact is registered, click “Next”;
Step 10: At the end, click on “Review plan” to finish. You can also enable the “Delete my account” switch so that Google deletes the data three months after inactivation;
Step 11: Finish by clicking the “Confirm plan” button.
This post may contain affiliate links, which means that I may receive a commission if you make a purchase using these links. As an Amazon Associate, I earn from qualifying purchases.