One of the most frequent Windows 10 errors when installing an update is related to the System Service Exception error, which often depends on the win32kfull.sys and win32kbase.sys files. Depending on the source of the problem, the method for fixing it may vary depending on the system components affected. This time let’s see how to fix the Windows 10 System Service Exception error, the following methods are compatible with Windows 7, Windows 8, and Windows 8.1.
Check Windows 10 Updates from Windows Update

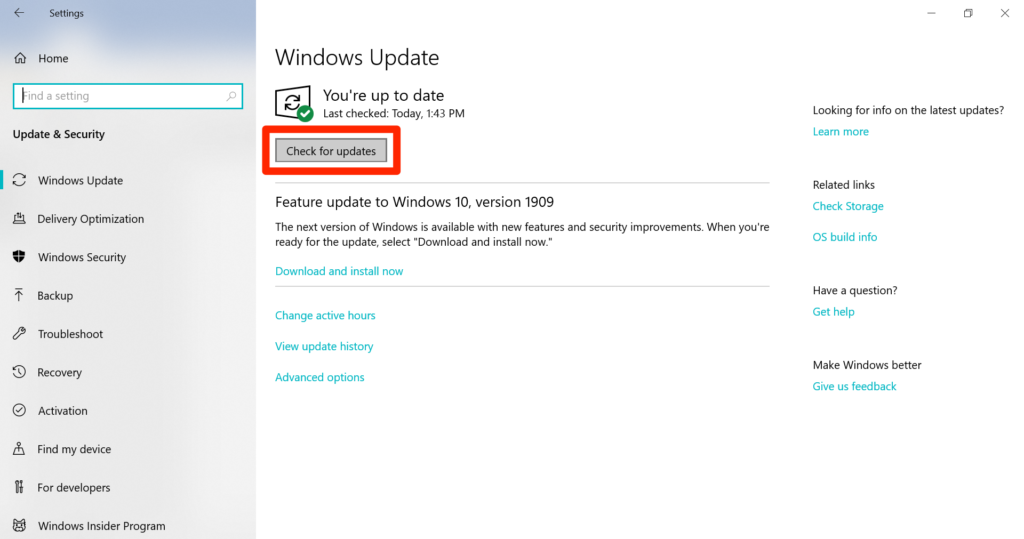
As we have just mentioned, the appearance of the Windows 10 System Service Exception error is usually related to the installation of a recent update. To check it, go to the Windows Update settings panel, which can be accessed by typing ‘Windows Update’ in the Windows search engine.
Once typed, click on “Check for updates” to verify the existence of new updates. You can also force the installation of a certain package from the section Available optional updates or through the option “View update history”, where you can know the complete list of updates that you have installed recently.
Use the Windows CMD to Repair the System Service Exception Error
This solution is applicable both for computers that can access the system normally and for computers that display a blue screen. In the first case, type the term ‘CMD’ in the Windows search box to open the system command prompt. Before running the program, right-click on the icon and select the Open with administrator privileges option.
With the command window open, type the following command:
- DISM /online /cleanup-image /restorehealth
Once it has finished executing, enter the following:
- sfc /scannow
Windows will automatically run a diagnostic tool that will repair all the dependency errors it finds in its search, including those related to the win32kfull.sys and win32kbase.sys files. The procedure to follow if your computer displays a blue screen at startup is similar to the one we have just described.

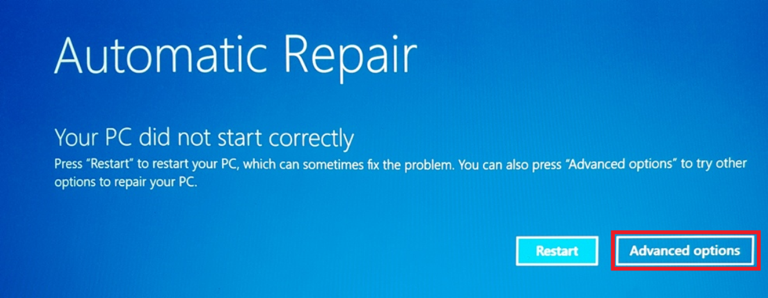
If Windows 10 does not display the Auto Repair screen, you will have to use a Windows 10 installation USB drive to force the Auto Repair menu to run.
From the Auto Repair menu, click on Advanced Options and again on Advanced Options.
Then, click on Command Prompt to force the command prompt to run. Now all you have to do is enter the commands listed above.
CHKDSK, The Command that Fixes Everything
Sometimes, the appearance of the error can be related to the corruption of the hard disks installed on the computer. To repair these errors, you will need to resort to the CHKDSK tool, which is accessible through the CMD by executing commands. The process to access the command prompt, whether the Window starts correctly or not, is similar to the process described in the previous method.
With the command machine open with administrative privileges, type the following command:

- chkdsk /r
After executing the command, the command will most likely cause the machine to display a message notifying that one of the disks is in use, after which an access request will be launched after rebooting the computer. All you have to do is press the “Y” key to accept the operation: the computer will automatically restart to execute the command you have just entered.
Check the Status of Windows 10 Drivers
After the installation of an update, the drivers may show some kind of incompatibility or become corrupted. To do this, type the term “Device Manager” in the Windows search box to open the relevant menu. The system will then display a window similar to the one shown in the screenshot below.

In the list of components that are shown, you will have to locate the devices that are marked with a yellow triangle. Right-click on the device in question and click on Disable device, then click on Update driver to install the latest driver that Windows finds.
Only in the case that the system does not find any compatible driver, you will have to go to the manufacturer’s website (Acer, AMD, Intel, HP, Synaptics, etc.) to download the driver and install it manually.
And if None of the Above Works?
The last solution is to install Windows 10 again through an installation USB. This solution is the most recommended if the computer is not able to access the system. Otherwise, you can always resort to the Windows 10 reset options to restore the system to its original state.

To access this menu, type the term ‘Reset this PC’ in the Windows search box. Then, click on “Get Started” the reset process. The good news is that we can keep the files stored on the hard disk, such as images, documents, and audio tracks, among others.
This post may contain affiliate links, which means that I may receive a commission if you make a purchase using these links. As an Amazon Associate, I earn from qualifying purchases.

